HOW DID YOU USE DIFFERENT MEDIA TECHNOLOGIES IN THE CONSTRUCTION, RESEARCH, PLANNING AND EVALUATION STAGES OF YOUR MEDIA PRODUCT?
Final Cut Pro
|
To make our Trailer project we decided to use the editing software, Final Cut Pro available on the MAC OSX Operating System. Final Cut Pro features a huge set of different options to tweak your video and edit it together smoothly. Some of the features available to tweak your video involves different transitions, text options, animations and colour correction tools. Different transitions and animations can make the change between different video clips smoother rather than an abrupt change through the use of different transitional animations or fades to the next image or clip.
Colour Correction allows you to change the clip or images colour to suit your needs through either lightening it, darkening it or even changing the overall colour filter. Final Cut Pro features a timeline where the clips can be edited together. The timeline stores the clips and can have multiple timeline lines. The timeline can also store audio tracks, sound effect and even text overlays on the clips. When it came to the Post-Production of our Trailer we used Final Cut in order to edit our Trailer. We used Final Cut to place the clips into the timeline and using the timeline features to trim down the clips to only the specific parts we needed. This means we were able to cut out any preparation for the actual shot were we had the camera rolling before hand. This technique came in handy when there were parts of a shot which could be salvaged from a potential failed attempt, for example in one of our shots filmed in a local residential area a local neighbor while we were filming shut her curtains in her window. The storyline of the Trailer wouldn't have made sense if this was still present in the Trailer, hence we were able to cut out the part of clip where this happens and salvage what part we needed. Another use of Final Cut which helped out with the creation of our Trailer was the colour correction tool. In the Final Shot of of Trailer we had a set of Social Media logo's with information for the audience to be able to keep up to date with news about the film that would have gone with our Trailer. To keep these logo's in theme with the rest of the Trailer's colorization and genre we colour corrected the logo's red to fit with the Trailer better than they would. |
This is a Screencast of some of the techniques you can use on Final Cut Pro. The first technique showcased is the ability to place in a transition. This is shown on the timeline where all the clips have been placed.The second technique showcased was being able to place in an overlay of text onto a clip, this is shown to be done by finding a text slot in the side menu and dragging it onto the timeline and writing in the text box what you want to text overlay to have.
The next technique shown in the screencast is the ability to key clips behind other clips. This is a technique that can assist with Green-Screening in a video to change the background of the clip. 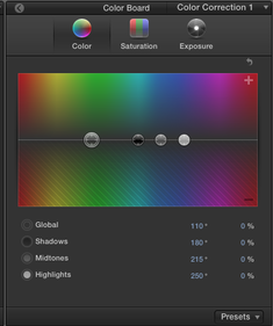
This is an image of the colour correction tool on Final Cut Pro. The colour correction tool features 3 main edits, Colour, Saturation and Exposure. All of these main image manipulations can be fine turned with the Global/Shadows/Midtones/Highlights slider. The four sliders manipulate the image in subtle ways so that you can achieve the best outcome for the type of atmosphere you want in a video clip or image.
|
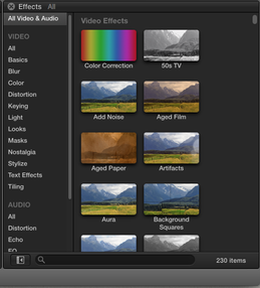
In the lower right hand corner of Final Cut there is a small menu selection that holds a variety of different options for video editing or image editing. This particular option shows the video effects tab. In the video effects tab you can put filters over your images, video clips or even audio. This can help you to stylise your video to your liking. All of these options can help enhance your video greatly if used correctly.
|
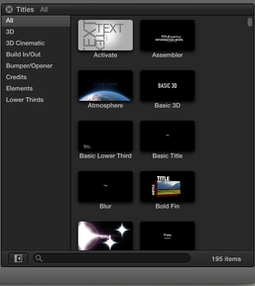
In the lower right hand corner of Final Cut there is a small menu selection that holds a variety of different options for video editing or image editing. This particular option shows the different titles you can place in your video through the timeline feature. These different title options allow for different animations of how your video's titles come on and off screen as well as any affects to make the title look more visually stunning rather than just text on a screen.
|
In the lower right hand corner of Final Cut there is a small menu selection that holds a variety of different options for video editing or image editing. This particular option shows the different transitions you can choose from. Transitions will help smooth the jump between two different video clips with a transitioning animation. There are many transitions to choose from and some of them can even be used on text overlays on your video.
|
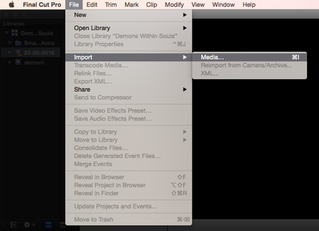
Importing new clips into Final Cut Pro is very simple. Simply go to the file option in the top task bar and scroll down to the Import Media option. The import media option should take you to a page filled with different uploadable clips.
|
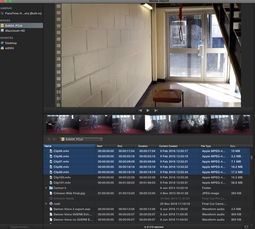
Once the page filled with different upload-able material has appeared. Scan through the upload-able files and select the files you want to import into Final Cut Pro. There is an option to the left hand side of the import screen to change the option for the storage for the computer where the files are located.
|
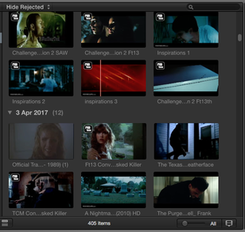
Once you have clicked the import button the selected clips should appear in the projects and clips box where all imported media will be stored for you to click and drag onto the Final Cut timeline.
|
Photoshop
|
To make our Magazine Cover and Poster for our Trailer project we used the software program Photoshop. Photoshop is an image editing software. If used correctly Photoshop manipulation of image can make images that look very professional which would be perfect for our Poster and Magazine cover, as making them look more professional will make them more effective as advertisements for our main Trailer project. Photoshop is a significant upgrade from image editing tools we have used before like the free software PicMonkey. As we needed to make these two product look as professional as possible, Photoshop was the software we chosen. The way Photoshop works is that all the images are part of a layering system. Layers will affect what images and text are over-layed on top of the other images. The layers can be used to easily overlay shapes, images and text over the top of each other and through that comes the ability to easily make something that looks professional. The side tool bar on Photoshop features many different image editing tools like the ability to remove certain parts of the images, edit the colours of an image or even change the image settings.
|
|
This is a Screen Cast of some of the techniques we used while making our Magazine Cover and Poster products using Photoshop. The first technique shown in this Screen Cast is the ability to add a layer of text. Adding layers of text helped significantly with the Magazine Cover for the different informational segments and taglines featured all over it as well as the main title of out Trailer. Another technique shown within this Screen Cast is the ability to place in another image and manipulate the colour of it to suit your needs. This is very helpful in the making of both documents due to the different types of images and colorization styles each have. The next technique shown in the Screen Cast is the ability to cut parts of an image of the main thing and move it around the canvas as a separate layer. Another tool shown off is the text manipulation tool where the way the text appearing on screen can be changed in style of direction to make them look different from just the normal flat overlay of text.
|
|
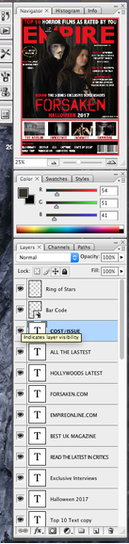
To the right hand side of the Photoshop user interface lies the layers bar, colour selection and preview image. The layers tool allows you to click and drag the layers you want above or below each other. The layers above another layer have priority to be placed above the below layers. The colour selection allows you to change the colour of the text that you can overlay on to the image. The preview image auto updates so that it displays the most up to date preview of what is on screen.
|
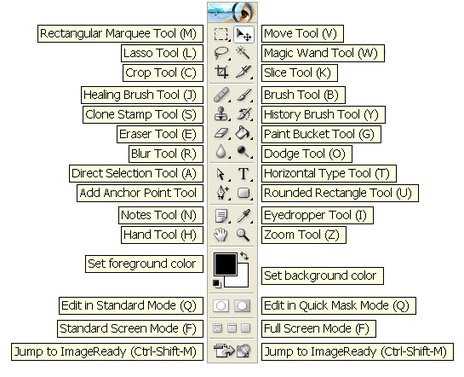
To the left hand side of the Photoshop user interface lies an entire tool bar of tools that can be used to edit your images. Some of the tools range from,
|
Weebly
|
This is a Screen Cast showcasing some of the different editing options available on Weebly as a website making software.
The first option demonstrated throughout this video is the ability to manipulate the size text with in text box using a very similar interface to the Microsoft Word text manipulation tools. Text manipulation is a very basic but important option to have when making any type of website or product. The second option demonstrated in this Screen Cast video is the ability to place in an image and a video of anything onto the website. This is shown to be done by clicking and dragging the corresponding boxes onto the page and copying the link of a video or image into the box or through directly uploading it from your own computer system if you have it saved or downloaded. The next option that is shown on this Screen Cast video is the ability to place in interactive elements. The interactive elements can be interactive presentations for example. Other unsupported types of interactive media can be placed in through the embedding code option. |
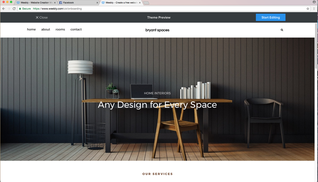
As for all of our research, planning and documentation, we used a website and blog maker called Weebly. Weebly allows the user to manipulate an easy to use interface that can create a very organised website or blog. This free website making service was a very important part of our project because it was the place to keep everything we have done in one place that the whole group could make use of and edit whatever they need.
Weebly is a very simple to use website making service, to start up you need to create an account by using your email address and setting up a password which will act as the password that is needed if you want to edit the website in any way at all. Once your account is set up you must select a template for your website. Weebly has a huge selection of different templates, called themes that can be selected by the user and can be customised to your content. Weebly has several features that make the editing of a website really intuitive to use for new users. The user interface involves a very simple click and drag system that will pace different components on the page like, text boxes, image boxes and title boxes. All text based functions feature manipulation tools very similar to that of Microsoft Word, a software widely known and used. Other very useful functions available on Weebly involve the ability to place in interactivity to the web pages you create. One of the options Weebly has for interactivity is to embed code into the web page. What this allows is for you to copy and paste a code for an interactive piece of software onto the page so that it is usable on Weebly. This feature allows for a huge amount of compatibility between different types of interactive mediums and software. |
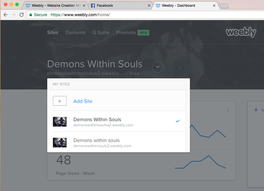
When starting up Weebly and making an account, to start a website you must select the My Sites tab and scroll to the option Add Site. This will allow you to begin the process of choosing a template for your website that you are going to make. If you already have websites you can pick between the ones you have made and select the Edit Website option to begin editing your content.
|
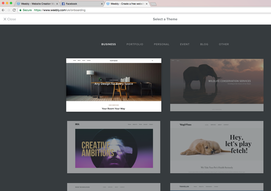
When you have selected to make a new website you will be taken to the theme selection. The theme selection involves you having to select the layout and style of your website. All images, text and other items already pre-loaded with the themed template will be able to be removed to your leisure. The actual layout to where the drop-downs and main header and footer will remain the same.
|
Once you have selected the theme you will then be taken the theme and you will be able to start up your website with the theme you have chosen. You will be able to change the pre-loaded items existing on the site and manipulate it to however you want.
|
